Introduction:
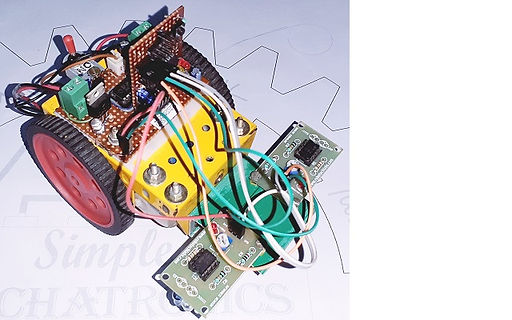
An Edge Detector is also a self controlled Robot, which will recognize edge of a flat surface (like table) and moves within the flat surface, without falling down. Two IR sensor modules are used on front side of the Small Robot to recognize the edge of a surface. The two IR sensors on both sides, read the presence of the flat surface and the signal is sent to the micro-controller (ATTINY84) accordingly.
The signals received from the IR sensor modules are analyzed by the ATTINY84, then Small Robot moves back a little and takes right or left turn accordingly, based on the 4 bit motor control data, through the motor driver (L293D) on base board.
(refer Small Robot Base Frame for motor control codes).
The concept of Edge Detector Robot is to avoid falling from edge of any flat surface. The Edge Detector searches for the reflection of IR light from the bottom surface, then moves forward or takes turn accordingly, to avoid falling from the flat surface.
Here, the Small Robot is programmed to take a right or left turn, when the IR light reflection is absent, depending on the IR sensor module signal, else moves forward continuously.

About Edge Sensing:
The Edge Detector uses two IR (Infra-red) sensor modules (readily available) to read the presence of bottom surface. The IR sensor module consists of an IR emitting LED , an IR sensor LED, indication LEDs and an OP-AMP IC (mostly LM358), with a trimpot for sensitivity adjustment. When the module is connected to 5VDC power supply, the IR LED emits IR light on the bottom surface. The IR light reflected from the bottom surface and falls on an IR sensor (in LED shape), placed near to the IR LED. The op-amp based circuit, reads the change in the internal resistance of the IR sensor, due to IR light falling on it, and status is displayed by glowing indicator LED (red). When the reflected IR light is absent, then the indicator LED does not glow (status off).
A three pin connector is available on IR sensor board, out of which two are for 5VDC and ground. The third pin is signal OUT pin. So, when the surface below the IR sensor is present, then a HIGH (1) signal is generated at OUT pin. Similarly, when the surface is absent, then a LOW (zero) signal is generated at OUT pin. The LED indicator glows accordingly. After assembly, adjust the trimpots on the IR sensor boards, independently, for their sensitivity to surface reflection.
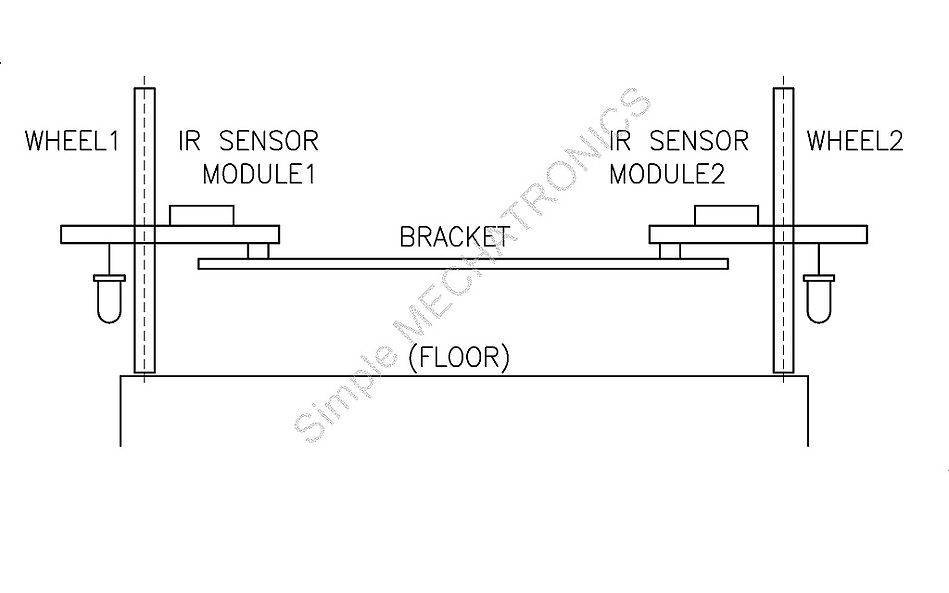
The arrangement of two numbers of IR sensor boards are show below. Both the IR sensor boards are to be fitted on front side of the Small Robot, on either side. The distance between the two extreme IR sensors shall be kept more than the overall width of the Small Robot.

Working of Edge Detector:
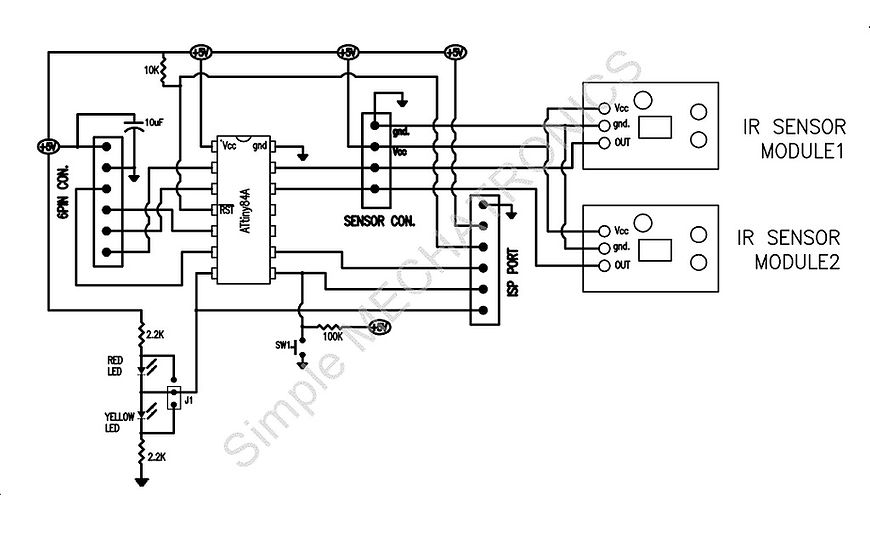
Making of Small Robot as Edge Detector is simple and easy. A simple bracket is required to position two IR sensor boards on the front side of the Edge Detector. A PCB with micro-controller ATTINY84 is used as control system for the Edge Detector, based on the digital signals (at OUT pins) available from two IR sensor boards.
The digital signals from the IR sensor boards are read as, two digital inputs by the micro-controller. Then, the programmed logic makes the Small Robot to make a right or left turn, if digital logic goes LOW (0), else moves forward. To avoid falling on immediate turning, the Small Robot moves little backward, then takes turn accordingly.
A button switch, SW1 on control board, is useful to start the Edge Detector, after switching ON the power supply to the Control Board.
The complete circuit diagram of Control Board with ATTINY84, is available below. Use jumper wires to connect two OUT pins from Sensor Board to Control board.

Download file from above link and remove .TXT extension.
