INTRODUCTION to Arduino IDE :
The IDE (Integrated Development Environment) is open-source software, easy to install, user friendly and all-in-one package available on-line. You may write your code and upload it to the Arduino board. You are able use some basic codes as examples also, which makes you comfortable while writing code. The Arduino code is normally known as Arduino Sketch.
DOWNLOADING Arduino IDE :
You may download the IDE package from the official website at following link (courtesy Arduino.cc):
Once you click the above link, the following page will appear on your screen, which will allow you to download the programming IDE for Arduino to match your Operating System. Select matching Operating System from the screen and download the IDE.

Once you complete the download, then Install the software on your computer / laptop. This will take some time and follow the on screen instructions. After successful completion of the Software, a short-cut is available on your system desktop with the logo as shown here.

USING Arduino IDE :
Now, click the Arduino shortcut. Then the Arduino IDE screen appears on the monitor as shown below.


In the above over-lapped screen, the important things to be noted are marked in red coloured rectangle.
1) At the top-left corner of overall screen displays, Filename and Arduino Version
2) The File name also appears on the top-left corner of white screen.
3) At the bottom-right corner of screen displays, setting of Arduino Board and connected Port [or default settings]
4) void setup ( ) is the function/method initially called (means used by the micro-controller) once the Arduino is powered on. So, this function/method is used to write the required code for setting Input/Output/Communication/Display etc.
5) void loop ( ) is called next to the setup function. Once the statements / coding is executed to the end of the loop function/method, then the micro-controller continues to execute statements of the loop function from the starting. So, the statements (or code) written in loop function/method is called repeatedly, infinite times. So, this function/method is used to read or monitor external variables as input and process them to output the signals accordingly.
Using Arduino EXAMPLES :
The main advantage with Arduino is, EXAMPLE CODES are available for easy understanding of coding and managing syntax while writing the code. Most of the Arduino programmers go through the related example before writing their actual required code. You may copy required coding lines from examples and paste in your code to save time and reduce syntax errors.
To select an example, click following menus/sub-menus in the order as,
File -> Examples -> Required Subject -> Required Topic.
Then click on the required topic. The example code appears on the screen as shown below:


COMPILING Arduino Sketch :
Compiling means, checking the code (sketch) written by you for all types of errors, like typographic errors, syntax errors, errors in assigning and using variables etc., except Run-Time errors.
Before, compiling the sketch, you have to select the type of Arduino board to upload the code. To select the Arduino board, click the menu/menu items as,
Tools -> Board -> Select the Target Board from the list
A model Arduino board selection is shown below:

To compile the sketch, you may click TICK mark on the top-left corner of IDE (below menu name File), or you may click the menu/menu item Sketch -> Verfy/Compile.
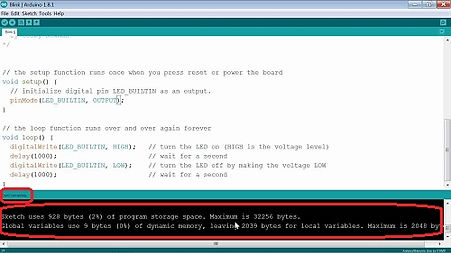
After compiling the sketch, the IDE displays the status of the compilation at the bottom of the screen (in black coloured box). The message contains the details of types of memory usage on successful compilation. In case of errors are found in the sketch, the details of the errors are shown.
The following model screens shows the compilation messages on SUCCESS and ERRORS successively


If the compilation is successful, then you may upload the sketch to your Arduino board. In case, there are errors displayed, then the errors should be cleared one-by-one. A red band is displayed on the coding screen (editing pane) and error text in red colour is displayed on output screen (black pane).
UPLOADING Arduino Sketch :
Once compiling is successful, the code (sketch) may be uploaded to the Arduino board. To upload the sketch, the target Arduino board has to be connected to your system (PC/laptop). Then select the Port from menu/menu items as
Tools -> Port (shows default) -> Select the Port Number connected to Arduino board
Then, set the Programmer as required. Use AVRISP MkII [by default] or AVRISP for most of the Arduion boards, unless you are using a specific type of Arduino board / programmer. You may set the programmer menu/menu items as,
Tools -> Programmer -> Select the programmer from the list
You may test the connection through menu/menu items as,
Tools -> Get Board Info
The IDE reads the Arduino board information and displays the details of the Arduino board, if the port connection is correctly set.
A model Arduino Port selection and testing with reading information are shown below:


On completion of settings as explained above, you may click ARROW mark on the top-left corner of IDE (below menu name Edit), or you may click the menu/menu item Sketch -> Upload.


Then, a progress bar is displayed below editor screen on right side and "Uploading..." message is displayed on left side.
If the sketch is uploaded successfully to the Arduino board, then the "Done. Uploading" message and memory details are displayed on output screen (bottom black pane). In case, there are error(s) while uploading the sketch to the Arduino board, then the error(s) are displayed on output screen (black pane) in red coloured text. Check / study the error(s) and check the connection once again, the re-upload the sketch.


NONE can distroy iron, but its own rust can! Likewise, none can destroy a PERSON, but own mindset can.
– Dr. Ratan Tata